I finished the cotton boning layer and the satin layer while school was still in still in session. Then I let it sit for a long, long time while I thought about the lace and worried if I had enough. I had purchased 5 yards, the last 5 yards off of a fabulous seller on Etsy (MaryNotMartha) the pattern indicated I needed much more than that to be successful. (Spoiler: The pattern lied it was fine! I even had enough scalloped edging over to make my veil.)
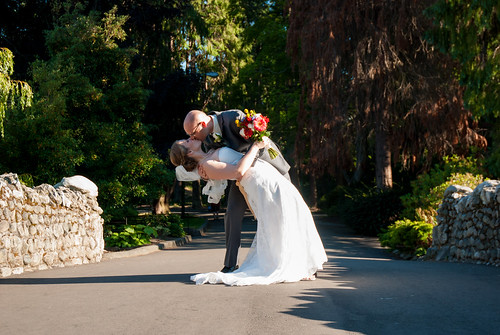
Enough chat - Picture time!! Let's start with the final product... that's why you're all here right?
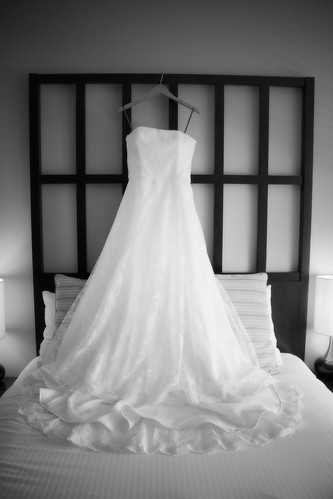
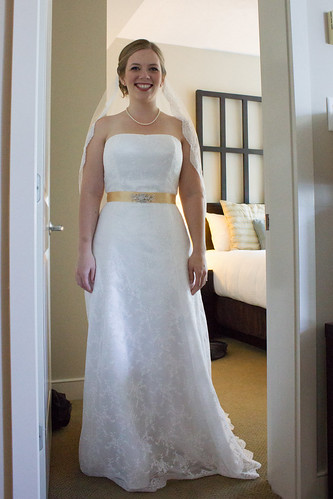
Without shoes - with shoes the scalloped hem was the perfect length. I promise.
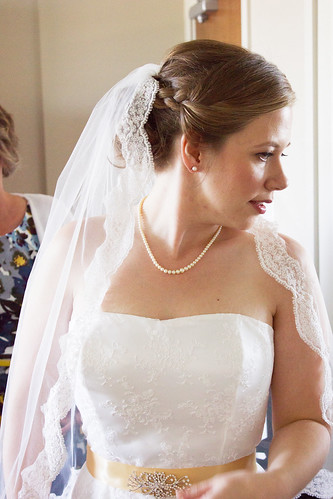
Here is a closer image of the bodice and the veil.
And the back:

Overall, I was extremely pleased with my dress. It was light and comfortable (although the corset bra I wore under it made gorging myself at dinner difficult) and almost exactly as I had envisioned.
Construction Details
This is text heavy and kinda boring but reading about others who had made their own dresses was a great motivator when I was deciding whether or not to sew my own dress so if you are considering it - or really into sewing- read on!
Layers
1 - Cotton bodice with boning and attached cotton "slip" that ended about knee height. (I had planned on adding crinoline to this layer at the bottom but ended up liking the look of it without better).
2 - Satin dress- skirt portion lined with voile.
3 - Lace overlay
Bodice
First, boning was way way easier than I imagined. I guess that is a typical way to feel about the unknown. Sort of like when people are (overly) impressed when I'm wearing something I've sewn. But back to boning. At Fabricland, they had plastic boning in channels and the sew-in variety. I used both in a few of the muslin bodices and the final bodice had a combination of both (b/c I decided I needed a bit extra and didn't want to buy new stuff so I ripped out some of the sew-in variety from my first bodice). I think each of them have their place. I prefer the type with channels as you don't have to add the plastic into the dress until you are ready to close the channels off. This just makes it a bit easier to maneuver everything around.
Originally, I had planned on making the neckline more scoop than sweetheart and the first bodice was much more of a scoop but had some serious gaping going on. For the second version I stayed much closer to Simplicity's bodice pattern but with a FBA, a bit of added height and a bit less of a sweetheart neckline. I also used clear elastic in the top seam to get it to hug my body and I was pretty happy with the results. No wardrobe malfunctions here!
Skirt & Train
The satin layer was dead simple here just cut and sew. I hemmed it with horsehair braid which made it look like I had a bigger hem then I did (which looked fine with the lace but a bit strange on its own). It also made it shorter than I intended which meant I had to get new kitten height heels to match. Despite this I think it made the dress fall better and not cling at all (in fact I decided I didn't even need crinoline because of this).
I lined it in voile which was nice because it was super light and it felt nice against my skin. I carefully hand tacked it to the inside of the satin hem giving it more slack than it needed (I'm sure there is a name for this... not a bubble hem but something like this?). I know it is better to have linings separate but I was worried about the train flipping over and showing my totally unfinished seams.
.JPG) |
| Testing the fit and lace placement. |
Lace
This was by far the hardest part to find. The lace at fabricland was very cheap looking and downtown at Gala fabrics the lace started at $80/meter and went up, way up, from there. Finally, after weeks of scouring I found some lace online and fell in love. The fact that I couldn't get more lace, should I royally mess up, held me hostage for a few weeks until I worked up the nerve to actually cut into my precious supply.
After a ton of back and forth and researching the best ways to seam lace I decided to just cut it (with slightly less than 1/4" seam allowances) and sew it with a small zigzag stitch. This turned out to be the best choice for this lace as the design was spread too far apart to get that seamless look you can get with more decorated lace fabrics. Also. It was fast. Way fast. Although, the only time I had to unpick something throughout the entire process was with the lace. That was mind-numbingly slow. 2 minutes to sew the seam and about 1.5 hours to unpick it. Ugh.
The front and side front panels were cut with the scalloped lace intact and I lined them up the best I could. The back and train panels were too long so they had to have the scalloped hem added after. This was surprisingly easy and very satisfying. I simply cut off the scallop in one long piece, pinned it in place while it was on the dress form, so I knew it looked right, and then zigzaged it around the design. After it was done you couldn't see the zigzag and it looked seamless. Success!
.JPG) |
| Zig Zag! |
.JPG) |
| I didn't even take the lace off the dress form to add the scalloped hem. I just spun the dress form as I sewed. It worked beautifully! |
The bodice was machine sewn together and then hand sewn to the inside of the bodice at the top and hand sewn around the zipper. I even attached the lace skirt by hand sewing it in place along the waist seam. Slower, but I had no desire to unpick anymore lace seams should something go amuck! Although I was worried about someone stepping on the train and it pulling off so I sewed it on 3 times! I wasn't too worried about how it looked as I knew I'd have the ribbon belt covering the waist seam and any visible stitches.
The Belt
The ribbon belt was simply a roll of ribbon I bought at Fabricland. Surprisingly it was the only colour/texture/width I liked at Michaels or Fabricland. When I went to get it cut the woman said it was in the wrong section and I was supposed to buy the entire roll (and at 65% off it was fine by me). Of course when I got home there was exactly as much as I used left on the roll!!! There were supposed to be 5 METERS of it! Although, maybe I should be happy about that since it made debating the belt length a non-issue! I cut the ends diagonally and used a tiny bit of fray check to stop it from fraying. It dried totally clear and you couldn't see it at all.
The bling on the belt was a purchased pin from Michaels.

The Veil
I was planning on making a very simple veil from some ivory tulle. It turned out that the tulle was the exact same colour as the lace on my dress and I had enough scalloped edging left for the veil. I attached it the same way I did them hem on the dress and hand sewed it to a metal hair comb. It was very simple and surprisingly fast. The cost of veils at bridal shops ESPECIALLY those without any embellishments is outrageous and unjustified. I think the tulle cost 2 dollars and I still have a bunch of it left.

Budget Breakdown
As I wasn't primarily doing this to save money I'm not actually sure.... but I think about $250 including the belt. The lace was the most expensive coming in at around $100 and the rest of the fabric was cheap and on sale at Fabricland.
Confessions
I didn't pre-wash any of the fabrics. (so what if it shrinks if when I wash it...)
I didn't finish the majority of the seams. (I trimmed the seams and took my chances with the fabric unraveling on me in the span of a few hours)
I only did a muslin for the bodice (although, to be fair the bridal satin was cheap and easy to replace).
Conclusion
I was really happy with the end result and I never felt like I had taken on more than I could manage. I would completely recommend making your own dress to any bride with sewing skills (if you're comfortable with a backup plan - summer dress in white anyone?) It really is an amazing feeling and a challenge you only get to try out once (in theory).
Now I can get on with sewing up some of these amazing new patterns that have been making appearances all over the blogosphere. The Colette Hawthorne is first on my list!
xoxo
Oh wow, your wedding dress is spectacular. You did a fantastic job! Congratulations!
ReplyDeleteThank you!!
Deletexo
Awesomeness! Purely beautiful!! Glad I was there to share in your special day ;) xoxo
ReplyDeleteI am attempting to make my own wedding dress too! I did a test run of my bodice, and it came out great (shapewise). I have a few questions:
ReplyDelete1. Did you use cotton or cotton twill for the base of your bodice?
2. Did you use any interlining in the bodice? If so, what type?
3. What tricks did use to get your bodice so flat without any wrinkles? It looks awesome! :)
Hi Andrea, I just noticed your comments now and I hope your wedding dress turned out beautifully.
Delete1. I used regular cotton for the base - I think part of it was cotton sheeting and the other part was just a plain cotton I had in my stash.
2.I didn't use any interlining.
3. I didn't do anything special to get my bodice flat but the boning did go into the cotton layer and then the satin was on top and everything was well trimmed and clipped maybe that contributed to the lack of wrinkles?
Best of luck on your dress and congratulations!! I'd love to see a picture of your completed dress!